Ultimate guide to self-hosting Tolgee with Content Delivery (CDN)

HHello, amazing Tolgee self-hosters 🤟
In this tutorial you will learn how to self-host Tolgee for using with Content Delivery features with S3 bucket (or Azure Blob).
Free self-hosted version allows you to create single Content Delivery configuration, and you will have to stick with single storage configuration per your instance.
To self-host Tolgee, you can use several different deployment options. You can use a simple Docker container, run the Java .jar file or use Kubernetes or other orchestration tools. In this tutorial, we will use docker-compose with a standalone Postgres database.
To follow this tutorial, you can clone this repository, to get started quickly:
git clone https://github.com/tolgee/docker-compose-content-delivery-example.git
The Docker Compose configuration
According to the self-hosting documentation
section, this is how your docker-compose.yaml should look like.
version: '3'

services:
  app:
    image: tolgee/tolgee:latest
    volumes:
      - ./data:/data
      - ./config.yaml:/config.yaml
    ports:
      - '8089:8080'
    environment:
      spring.config.additional-location: file:///config.yaml
    deploy:
      restart_policy:
        condition: on-failure
    depends_on:
      - db
  db:
    image: postgres:13
    environment:
      POSTGRES_DB: postgres
      POSTGRES_USER: postgres
      POSTGRES_PASSWORD: postgres
    volumes:
      - ./data/postgres:/var/lib/postgresql/data
    ports:
      - '25432:5432' # <-- If you want to access your postgres from outside of docker network
The configuration file that is mounted to the container should look like the one below. It's recommended that the configuration be provided via a mounted property file. It's cleaner to read, and it's better for security since the environment variables can be subject to logs.
tolgee:
  postgres-autostart:
    enabled: false
  authentication:
    enabled: true
  content-delivery:
    public-url-prefix:
    storage:
#      Uncomment this for Azure Blob
#      azure:
#        connection-string:
#        container-name:
      s3:
        access-key:
        bucket-name:
        endpoint:
        secret-key:
        signing-region:
spring:
  datasource:
    url: jdbc:postgresql://db:5432/postgres
    username: postgres
    password: postgres
It's also a good idea to change the POSTGRES_PASSWORD in both files to something more secure.
Setting up S3 bucket
For the simplicity of this tutorial, we will create a public S3 bucket. For optimized configurations, you might want to put Amazon CloudFront in front of it, but I will leave this to you. Providing storage configuration is required to use Content Delivery features on the free self-hosted instance.
- Go to AWS S3 Console
- Click on
Create bucket - Fill in the bucket name. I am naming it
tolgee-cdn-bucket-1234 - Deselect
Block all public accessand acknowledge that the bucket will be public (ignore if you plan to use CloudFront or other) - Click
Create bucket - Ignore following steps if you plan to use CloudFront or other
- Open the bucket by clicking it in the list
- Go to permissions and add this
Bucket policyjson and replace the bucket name with your name. This will make your bucket public.
{
    "Version": "2012-10-17",
    "Statement": [
        {
            "Sid": "PublicReadGetObject",
            "Effect": "Allow",
            "Principal": "*",
            "Action": "s3:GetObject",
            "Resource": "arn:aws:s3:::tolgee-cdn-bucket-1234/*"
        }
    ]
}
Now. You have your S3 bucket ready.
Great! 🎉 Now you have your S3 bucket ready.
Now we need to create credentials to access this bucket.
- Go to AWS IAM Console
- Click on
Usersin the left menu - Click on
Add user - Fill in the username. I am naming it
tolgee-cdn-user-1234 - Go to step 2
Set permissions - Click on
Attach existing policies directly - Click on
Create policy - Click on
JSONtab and paste this
 {
    "Version": "2012-10-17",
    "Statement": [
        {
            "Sid": "VisualEditor0",
            "Effect": "Allow",
            "Action": [
                "s3:PutObject",
                "s3:GetObject",
                "s3:GetObjectAttributes",
                "s3:ListBucket",
                "s3:DeleteObject"
            ],
            "Resource": [
                "arn:aws:s3:::tolgee-cdn-bucket-1234",
                "arn:aws:s3:::tolgee-cdn-bucket-1234/*"
            ]
        }
    ]
 }
- Review and create policy. I am naming it TolgeeCdnBucketPolicy
- Select this policy in the user creation wizard
- Create the user
- Go to
Security credentialstab of the new user - Click on
Create access key - Select
Third-party serviceorOther - Finish the creation
Store the Access key and Secret key in a safe place. You will need them in the next step.
Cool! Now you have everything ready. You can fill in the config.yaml file with the credentials.
I am using the eu-central-1 region.
  ...
  content-delivery:
    public-url-prefix: https://tolgee-cdn-bucket-1234.s3.eu-central-1.amazonaws.com/
    storage:
      s3:
        access-key: AKIA...............
        bucket-name: tolgee-cdn-bucket-1234
        endpoint: s3.eu-central-1.amazonaws.com
        secret-key: <your secret key>
        signing-region: eu-central-1
  ...
Don't forget that the public-url-prefix and one of the storage configurations are required to use
Content Delivery features unless are on an advanced self-hosted plan with per-project content storages enabled.
Testing time
Let's run the beast.
docker compose up
When the service is running, you can run this command to obtain the initial admin password stored in data/initial.pwd
cat data/initial.pwd
Now open your browser on http://localhost:8089 and log in with
- username: admin
- password:
the initial password obtained in previous step
Then open the demo project and go to the developer settings (</>) section accessible from the menu on the left.
You should see empty list of the content delivery configurations.
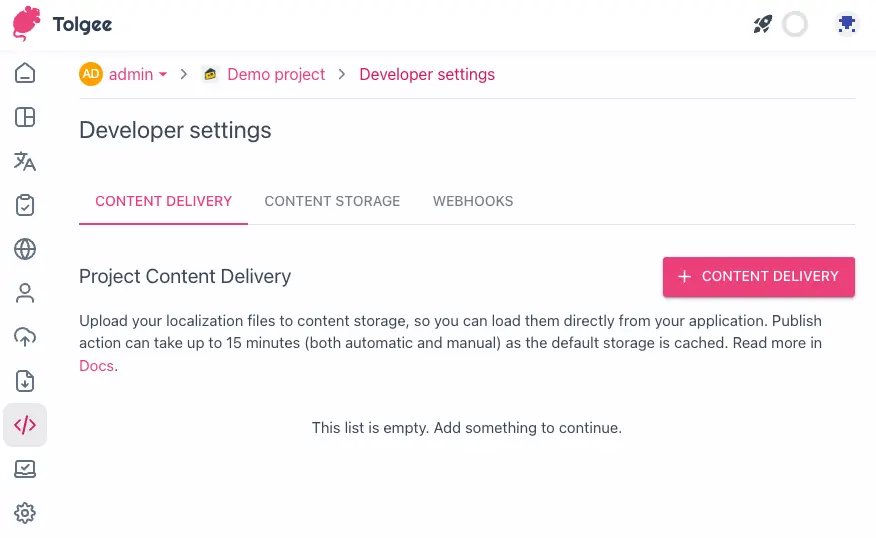
Creating new content delivery
- Hit the
+ Content deliverybutton - Keep the properties as they are and hit save
Content delivery successfully created!message should be prompted
By now, you should have your project data uploaded to the S3 bucket and made accessible. For my public url prefix, this file can be accessed on
https://tolgee-cdn-bucket-1234.s3.eu-central-1.amazonaws.com/305b9eb32a8c9de207af72c9232f29af/en.json
Thanks for reading, Tolgee friends. ❤️